Since I can't just run through the drive-thru ( not that I would anymore even if I could- ewwww) I like to have things on hand that are easy and quick to make in case I need to eat on the run. Today was one of those days that I didn't have time to stop and eat. I had both girls' school Christmas parties back to back, so all I had eaten was some pomegranate applesauce and my morning coffee. By the time I got home I was STARVED. On the way home all I could think of was the yummy noodle meal in my cabinet. I had picked it up at the store last week. It was a vegan meal, with basic ingredients and NO DAIRY (or fish products). I followed the directions and got ready to finally sit down and have some lunch (by now it was 3pm). But... it was DISGUSTING. It was so bad that no matter how hungry I was I just couldn't eat it. The noodles were mushy, the sauce didn't have a good flavor at all- I can't even describe it. Way too much garlic mixed with too much soy sauce, and then made sticky somehow. My expectations weren't overly high for a meal out of a box, but this was beyond bad. It ended up in the trash and I ate a pretzel rod instead.
So my rating scale doesn't even count on this one. Because on a scale of 1-5, it was a Zero hands down. (And I'm still hungry...)
Off to scrounge for something tasty.

Monday, December 20, 2010
Saturday, December 18, 2010
Oops I made too much rice... so make Rice Pudding!
Have you ever over estimated how much rice you'll need for a meal and ended up with leftovers? I did this last night and rather than waste 2 cups of cooked rice, I decided to try making my own dairy free rice pudding. My kids love rice, and they love pudding, so I thought "why not?" Plus my in-laws had unexpectedly stayed for lunch since their car died in our driveway so I decided to make it for them too.
I searched online through several sites for a good recipe, but I didn't find what I was looking for. So I decided I would just combine 2 methods and see what happened. The results were actually quite good!
It was super simple and didn't take very long at all.
Ingredients:
2 cups cooked rice
2 cups vanilla soy milk
pinch of salt
1/3 cup demerara sugar
2 eggs, beaten
1-2 teaspoons ground cinnamon
1 teaspoon ground nutmeg
1 teaspoon vanilla extract
handful raisins
My Method: I combine the stove top method with the oven method.
Preheat oven to 350 degrees.
Add 2 cups cooked, leftover rice to a pan.
Add 2 cups Vanilla Soy Milk.
Add 1/3 cup demerara sugar
Add pinch of salt
Cook on medium low heat until the rice softens, stirring often.
Spray casserole dish with olive oil cooking spray
Once rice is softened and sugar is dissolved, remove from heat and pour into casserole dish.
Add beaten eggs, cinnamon, nutmeg, vanilla, and raisins. Stir well so all ingredients mix in completely.
Put in oven for 30 minutes. After 30 minutes, stir.
Cook for 10 minutes more, or less. Do not let it get too dry. If all the liquid dries up, add a splash of soy milk when you remove it from the oven.
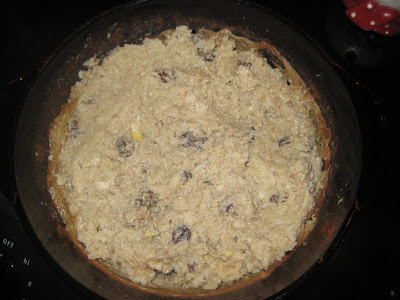
I've never thought rice pudding was an attractive dish, but it sure is tasty on a cold day!
When asked if I should make it again, I got a unanimous "Yes" from my family.
Tuesday, December 7, 2010
When in the South...
Today I did something I never ever thought I would do. I roasted my own peanuts. Our winter CSA gave us a bag of green unshelled peanuts and when I asked the farm owner how to cook them, she said just put them in the oven and roast them. I always thought roasting peanuts would be more difficult, after all you pay so much for roasted peanuts by Planters. But nope, this was so simple and something I will definitely do again!
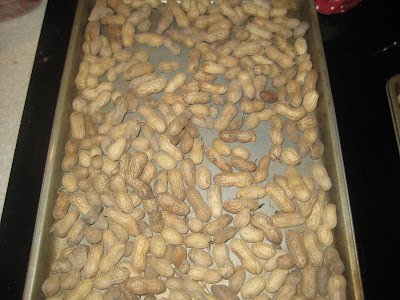
Before roasting
Preheat the oven to 350 degrees.
Put the peanuts on a cookie sheet, making sure to pick out leaves, stems, and shrivelled peanuts.
Put them in the oven for 20-25 minutes
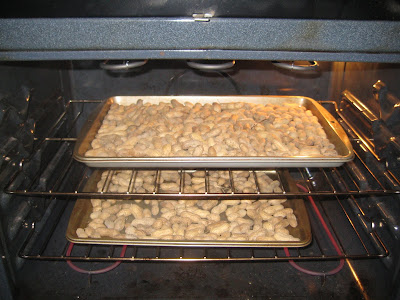
Take them out before they are completely done, as they will continue to cook in the shell.
After they have cooled, put them in an airtight container.
That's it. Nothing fancy, not a lot of steps. And my husband loved them! Hope we get more this week!
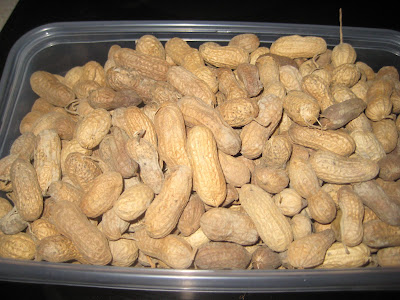
All done, cooled, and ready to eat!
Product Review #1: Amy's Kitchen Gluten Free Non- Dairy Spinach Pizza
I am going to be adding product reviews to my blog along with the recipes. My cheese-eating husband will also be helping with it by giving his opinion on dairy free products I try. This will ensure a non-biased review of a product. So often I have been so excited to find something that is a dairy replacement, only to be disappointed when it turns out to be awful. And since most of these products are more expensive, it can be a waste of money to buy something that turns out to not be edible or enjoyable.
My rating scale will be 1-5. 1 Being "a waste of money, totally unlike the real thing, not at all enjoyable" and 5 being "Can't tell it's dairy free".
I'll rate it based on:
Appearance
Texture
Taste
Over all score will be an average of these 3.
The first review is of Amy's Gluten Free, Non-Dairy Spinach Pizza. I LOVE pizza and I miss pizza so I have been trying to find a substitute to satisfy that craving I get every now and then. My local grocery store recently stocked this product (they carry a lot of Amy's Kitchen, but I haven't seen this pizza there before).
On Appearance I give it a 3. The cheese doesn't melt very well, and the crust burns easily on the edges.
On Texture I give it a 2. The crust is too soft and crumbly. It's almost mushy in spots. The crust seems to absorb too much moisture from the spinach mix.
For Taste I give it a 4. It actually has a very good flavor- the spinach mixture tastes almost like a pesto and I can taste a flavor similar to parmesean cheese. The soy mozerrella cheese has very little flavor but the spinach makes up for that.
Over all I give it 3.5. I give it the extra half point because, surprisingly, my very picky 4 year old loves it. She had 2 helpings. It's good for kids because it's not too cheesy so it's not a choking hazard, and the sauces aren't overpowering so it's easy for them to eat.
It's not like the real deal, but it's not bad either.
Magical Birthday
My oldest daughter is turning 7 years old, so we had her birthday party this past weekend. This year she had her heart set on a Harry Potter themed party and how could I say no? The only problem was that the party stores don't really sell HP themed party supplies so I had to be very creative.
The first thing we did was make the invitations which were their acceptance letters to Hogwarts.

( I covered up the child's name for the picture)
They also got their ticket for the Hogwart's Express:

(I covered our address for the picture)
The envelopes were even sealed with the red wax seal with the Hogwarts crest on it.
We kept the decorations simple outside with just a Hogwarts Sign:

Train Tracks on our front sidewalk:

And Harry's Nimbus 2000 by the front door:

I had a couple friends dress up. One was dressed as Mrs. Weasley, one as Professor Snape, and I was Professor McGonagall.
We based the party mostly on the first book- "The Sorcerer's Stone". I set up 4 classes for the kids to take:
The first class was Defense Against the Dark Arts. For this the kids played freeze dance and whenever my husband ( who was playing Prof. Quirrell for this game) said "Stupify!" the kids had to stop.
The second class was Potions with Professor Snape. My best friend's husband played the part of Snape for us and did a fabulous job! I had a table set up with a large plastic cauldron. In it I placed a pitcher of white vinegar, plastic cups, baking soda, and 4 vials of food coloring. The kids got to make "Good Luck Potion" by adding vinegar to their baking soda and food coloring mix.
Care of Magical Creatures was third. Since it is so close to Christmas we decided to incorporate a Christmas project by making reindeer food. I had bags labeled with a poem found online:

Then the kids filled their bags with dry rolled oats and sugar cookie sprinkles. Some recipes say to use glitter, but the birds eat the glitter and it makes them sick. The sugar sprinkles are much safer. The kids had a great time with this project.
The last class was Herbology. I found small plant kits at Lowe's for the kids to plant. We had Edelweiss, Spruce, and Allysum.

After all the classes were completed we had the Feast in The Great Hall. ( here's where we get to the food)
We set up our main living room to look like the Great Hall and decorated with Gryffindor Colors (since my daughter was dressed as Hermione) My husband set up 2 small disco balls to make the ceiling look enchanted. I even found crackers in Gryffindor colors!

Since it was mostly 5-10 year olds I didn't have a lot of food- just snacks. We had:
Dragon Wings: Straight out of a bag breaded chicken wings. These were specifically requested by the Birthday Girl. ( they were Dairy Free too!)
Dragon's Blood Punch:
Equal parts apple juice, cranberry juice, and ginger ale. I started by adding each in 2 cups at a time until my punch bowl was full. It was really yummy!
Muggle Mix:
Your basic Chex mix recipe that can be found on the box of Chex cereal- nothing fancy for this. ( Kids don't do fancy, they do simple)
Magic Wands:
Long Pretzel Rods
1 bag semi-sweet chocolate chips
different color sugar sprinkles
Line a baking sheet with wax paper
Melt the chocolate chips in the microwave- took about 2 minutes. I do it in 30 second intervals and stir often to keep them from burning.
Spread the melted chocolate on the top 1/3 of the pretzels. I used a small spatula and it worked great.
Lay on the lined baking sheet and sprinkle with sugar crystals.
Place in refridgerator overnight to harden the chocolate.
These were a hit! I even made extras just for the adults at the party.

I baked her castle shaped cake, but I had a friend decorate it since I don't start my cake decorating class until tomorrow:-). She did an amazing job!
It was just a basic chocolate cake with chocolate frosting, buttercream frosting, chocolate chips, butterscotch chips, and a little coconut. Of course we added re-lighting candles to it for a little "magic" of our own!

The last thing was the goody bags.

I made all the kids magic wands of their own by cutting long wooden rods into 8 inch segments and spray painting them brown. Then I added some lines of gold paint to the tips.
I made 2 small treat bags to put in the larger bags. One was from
Weasley's Wizarding Wheezes and in it I put a finger trap and a kaleidescope.

The other was a sweets bag from Honeydukes with candy and a chocolate brownie shaped like a frog (was hoping to make chocolate frogs in candy form but was unable to find a frog shaped candy mold, so I had to settle with cutting brownies into frog shapes)


The party was a success and I did have a lot of help to pull it off. Now my younger daughter is already planning her party for the spring!
Monday, November 22, 2010
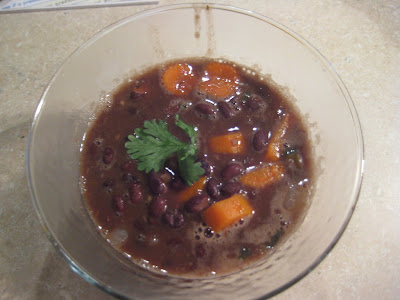
Easy Black Bean Soup
My family loves black beans. We eat them so often I buy them in bulk now. My oldest daughter loves my homemade black bean dip (that recipe will be posted the next time I make it). I add them into tacos, make black bean and beef enchiladas, and I've posted my Black Bean and Andouille Sausage recipe recently. I found a recipe for a Black Bean Soup that I had been dying to try, and finally got a chance to make it last week. It was so good! I think it makes a fabulous lunch, especially as it gets colder outside.
Ingredients:
2 Tablespoons Extra Virgin Olive Oil
1 clove of garlic, crushed
2 large carrots, finely chopped
1 medium onion, finely chopped
2 15.5 oz cans black beans. (I prefer the Goya brand, but I do also like the Trader Joe's brand)
1 cup or more chicken broth
1 tablespoon brown sugar
1 teaspoon ground cumin
1 teaspoon ground oregano
2 Bay Leaves
1 tablespoon white vinegar
2 tablespoons- 1/4 cup (depending on your taste) chopped fresh cilantro.
*Adobo ( or other hot sauce) to taste I used Nando's Peri Peri sauce because it is what I had on hand. You can buy it at The World Market.

Directions:
1. Heat oil in a pot over medium-high heat. Add garlic and all seasonings, EXCEPT the hot sauce, and cook for about 30 seconds.
2.Add vegetables and saute, stirring often, for about 10 minutes, or until the veggies are tender

3. Add the chicken broth, beans, chopped cilantro brown sugar, and vinegar and bring to a boil.
4. Reduce heat to low and simmer, uncovered, for about 15 minutes or so, or until the soup thickens.
5. Remove the bay leaves and season with the hot sauce to taste. Garnish with fresh cilantro if desired.

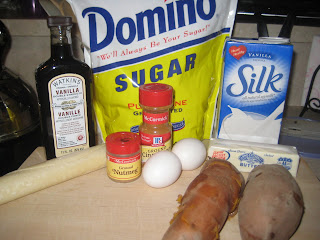
Just in Time for Thanksgiving- Sweet Potato Pie
This year our Fall CSA gave us fresh sweet potatoes. My family doesn't eat a lot of sweet potatoes- in fact my husband is not a fan of them at all. He does, however, love a good, homemade sweet potato pie. I decided to try my hand at it, especially since Thanksgiving is coming up. It was so easy and delicious! My 4year old loved it, and I actually had to make another one to send in to her preschool for their Thanksgiving Feast.
Ingredients:
1 lb of sweet potatoes
1 stick butter, softened
1 cup white sugar
1/2 cup soy milk
2 eggs
1/2 teaspoon ground nutmeg
1/2 teaspoon ground cinnamon
1 teaspoon vanilla extract
1 pie crust
Directions:
1. Boil sweet potato whole in skin for about 50 minutes, or until fork tender. Cool sweet potato by running cold water over them. Peel skin off.
2. While sweet potatoes are cooking, place pie crust in 9 inch pie plate. Preheat oven to 350 degrees.
3.Cut sweet potato into chunks and put in bowl. I used my Kitchen Aid mixer, but you can use a hand held also. Add softened butter and mix until smooth. One at a time add in sugar, milk, eggs, nutmeg, cinnamon and vanilla. Beat on medium speed until mixture is smooth and lumps are gone. Pour filling into an unbaked pie crust.
4.Bake at 350 degrees F (175 degrees C) for 55 to 60 minutes, or until knife inserted in center comes out clean. Don't worry if the pie puffs up, it will sink back down as it cools.
Fresh out of the oven:
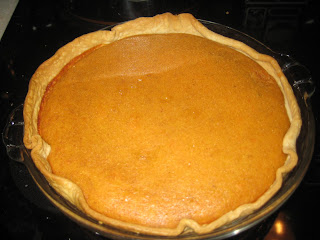
Time for dessert!
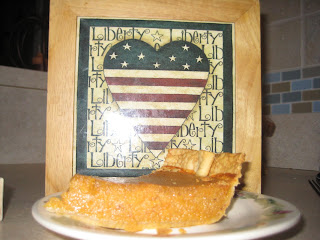
Happy Thanksgiving Ya'll!
Ingredients:
1 lb of sweet potatoes
1 stick butter, softened
1 cup white sugar
1/2 cup soy milk
2 eggs
1/2 teaspoon ground nutmeg
1/2 teaspoon ground cinnamon
1 teaspoon vanilla extract
1 pie crust

Directions:
1. Boil sweet potato whole in skin for about 50 minutes, or until fork tender. Cool sweet potato by running cold water over them. Peel skin off.
2. While sweet potatoes are cooking, place pie crust in 9 inch pie plate. Preheat oven to 350 degrees.
3.Cut sweet potato into chunks and put in bowl. I used my Kitchen Aid mixer, but you can use a hand held also. Add softened butter and mix until smooth. One at a time add in sugar, milk, eggs, nutmeg, cinnamon and vanilla. Beat on medium speed until mixture is smooth and lumps are gone. Pour filling into an unbaked pie crust.
4.Bake at 350 degrees F (175 degrees C) for 55 to 60 minutes, or until knife inserted in center comes out clean. Don't worry if the pie puffs up, it will sink back down as it cools.
Fresh out of the oven:

Time for dessert!

Happy Thanksgiving Ya'll!
Friday, November 12, 2010
Time... a mom's nemesis
I have still been cooking away in the kitchen and have several recipes to post, but with 3 kids, one of whom has been cutting 4 teeth this week and not napping, I have run short on time for blogging. I have been taking pictures and will be posting in the next day or two.
Here's what you can look for in upcoming posts:
Sweet Potato Pie made with sweet potatoes from our CSA
Easy Black Bean soup
Black beans and rice with chicken andouille sausage
homemade baby food- sweet potatoes and butternut squash
and a few more.
I did try a new recipe for cream cheese filled cupcakes, using tofutti cream cheese, but they were horrible! I'm still working on that one...
I also had intended to make chicken and dumplings this week, but the chicken we bought from the grocery store had an issue so we could not use it. Needless to say, I have since found a farm to get fresh chickens from and will be avoiding grocery store meat as much as possible.
Our new goal for our kitchen is to buy as little pre-packaged products as possible. This will take some time to switch over, but I hope to only buy fresh, natural ingredients and make all our food from scratch from now on. (with the exception of a few of the girls snack items) I already bake all of our sweet treats, and have started making the girls homemade oatmeal in the mornings. I know I can't cut out the cereal, but I can make my oatmeal, waffles, pancakes from scratch.
Also on the list of changes is to switch from soy milk to almond milk. I made oatmeal for myself today using vanilla almond milk and it was fantastic! I'll be using it in my cooking from now on, and will also be trying out different brands to see which is the best. Currently I am using Silk.
So that's it from here for now. Back to the kitchen:-) Happy Cooking!
Saturday, November 6, 2010
Black Beans and Rice with Andouille Sausage
I have the most fun cooking when I am not following a recipe. I'll get an idea of something I want to make, and just start throwing ingredients together to see what happens. That's how I came up with my own Black Bean and Andouille Sausage with Rice recipe. It started as a dinner creation one night when the husband was out of town and I had no idea what I wanted for dinner. Since then it has become something we make on nights that we either don't have a dinner planned, or a night when we are running short on time. I make sure I always have the ingredients for this on hand- it's quick, easy, and so good!
Ingredients:
1 pack Trader Joe's Chicken Andouille sausage
1 tablespoon Extra Virgin Olive Oil
1 large pepper chopped. Doesn't matter if it's green, orange, or red.
1 large Onion chopped.
2 large or 3 medium tomatoes, chopped
2 cans black beans, rinsed
1 can plain tomato sauce or 2 cans diced tomatoes
cayenne pepper
dark chili powder (all spices to taste)
ground cumin
1-1.5 cups rice
I didn't take a picture of the ingredients listed before I started. I did take a picture after I had started cooking thanks to my husband's suggestion that I should post this recipe...
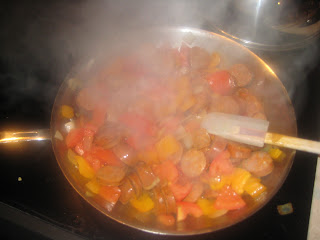
Easy method:
1. If sausage is frozen, thaw in pan of boiling water. Once thawed, slice.
2. Saute peppers and onions together in a tablespoon of Extra Virgin Olive Oil
until the onions start to soften.
3. Add fresh chopped tomatoes if you are using them
4. Add sliced sausage to the pan and allow the veggies and meat to cook together over medium heat for about 5 minutes, stirring frequently so nothing burns.
5.Add rinsed black beans and canned tomatoes.
6. Add in your spices. Stir well to mix everything together. Let simmer on low as the rice cooks.
7. Serve over rice.
A perfect dinner for snuggling on the couch with the hubby, a glass of wine, and a movie!

Ginger Carrot Slices
I have a friend who has recently moved here from South Africa and she has been teaching me new South African recipes,and also sharing her cookbooks with me. While we were at her house a few nights ago, I mentioned that I was trying to decide what to make for guests we were having over for coffee on Friday evening. Our guests were my husband's parents and friends of theirs visiting from France. The couple owns a winery in the Burgundy region of France, so we were having a special tasting at the Williamsburg Winery with them and had invited them to our home for coffee and tea after the tasting and dinner. I wanted to make a dessert, nothing heavy or too sweet, but also nothing ordinary or out of a box. (I am no longer making things from box mixes if I can help it). I had toyed with the idea of making my biscotti, but then Rochelle showed me a fabulous dessert cookbook of hers from home. It's called "Superb Slices". I have found several that I plan on trying, and the one I chose for our guests was the Ginger Carrot Slices. It was actually quite simple to make, and everyone liked it. This was light enough to serve after a full meal, but didn't leave you wondering where dessert was.
Ingredients:
1 and 1/2 cups plain flour
1 teaspoon baking powder
1 teaspoon ground cinnamon
2 teaspoons ground ginger
1/3 cup refined white sugar (you cannot substitute other sugars)
2 cups grated carrot
2 oz melted *butter ( half a stick)
1/3 cup honey
3 tablespoons vegetable oil
3 eggs, lightly beaten

Method:
1.Preheat oven to 350. Line bottom of greased 7x11 inch shallow cake pan with wax paper.
2.Sift flour, baking powder, cinnamon, and ginger into a large mixing bowl.

Add the sugar and carrots, mixing well. Make a well in the center and add the melted butter, honey, oil, and eggs. Mix together.

3.Pour into cake pan and smooth the surface. Bake for 25-30 minutes, or until top is golden brown. Cool before lifting out of the pan.

*I am able to have small amounts of real butter. 1 tsp of Butter only has .06g of lactose. However, I do have to be careful of how much butter a recipe contains and I will make adjustments if needed.
source: "Superb Slices" Published by Wild Dog Press, Johannesburg, South Africa 1998
Tuesday, October 26, 2010
Coffee Braised Pot Roast with Roasted Veggies
My husband and I have recently started buying our beef from a private farm in West Virginia. The beef is organic, free range, grass fed beef but since it's from a private farmer and not once of these larger farms the price is excellent. And the quality- it's the best beef I have ever had in my life! I will never buy beef from a grocery store again. This time around we split a whole cow with my parents so I currently have a deep freezer full to the top of several different cuts of beef.
Tonight I wanted to make a roast, but I never make just plain pot roast. I have a few different recipes I love ( I will share them all) but I think this is one of the best. I got it from Eating Well Magazine and it's definitely one we will be making again. The special ingredient is 1/2 cup strong brewed coffee. Since we always make coffee in the morning, this is something I always have on hand.
Ingredients:
1 arm roast ( you could use a chuck roast too)
1/2 teaspoon salt, or to taste
Freshly ground pepper, to taste
2-4 teaspoons extra-virgin olive oil
2 large onions, halved and thinly sliced
4 cloves garlic, minced
1 teaspoon dried thyme
1/2 cup strong brewed coffee
2 tablespoons balsamic vinegar
2 tablespoons cornstarch mixed with 2 tablespoons water

1.Season beef with salt and pepper. Heat 2 teaspoons oil in a large pan over medium-high heat. Add beef and cook, turning from time to time, until well browned on all sides, 5 to 7 minutes. Place in slow cooker

2. Add onions to the pans, reduce heat to medium and cook until softened and golden, 5 to 7 minutes. Add garlic and thyme; cook, stirring, for 1 minute. Stir in coffee and vinegar. Bring to a simmer. Pour over the meat in the slow cooker.

3. Set slow cooker on high for 4 hours.
4. To make gravy- bring juices from beef to a boil in a small pot over medium-high heat. Add the cornstarch mixture and cook, whisking, until the gravy thickens slightly, about 1 minute. Add salt and pepper if desired. You can strain out the onions if you want.
For variety I served this with Roasted Carrots and Cauliflower with Thyme, Roasted Potatoes with Rosemary, and a cucumber and tomato salad with a balsamic and olive oil dressing.
Carrots and cauliflower:
toss cut carrots and cauliflower with Extra Virgin Olive Oil, salt, pepper, and dried Thyme. Coat baking sheet with cooking spray and spread veggies out on sheet. Roast in a 400 degree oven for about 30 minutes, or until the veggies start to brown slightly.
Red potatoes:
cut potatoes into chunks, toss with olive oil, salt, pepper, and either dried or fresh Rosemary. Roast in a 400 degree oven for about 30-35 minutes.

(A side note for Moms- my kids both cleaned their plates tonight and even the 4 year old asked for a second helping of the meat and cauliflower so that makes this a kid friendly recipe in my book!)
Tuesday, October 19, 2010
Breakfast Made Super Simple
In my journeys through cyberspace I have come across several recipes for overnight oats. If you've not yet heard of it, this is a fabulously easy breakfast that you make the night before and is ready the minute you are ready to eat in the morning. The only problem I've run into is that most, if not all, the recipes I've found add dairy- usually yogurt. It's so hard to find dairy free yogurt that's not outrageously priced and that tastes somewhat good. So I decided to go ahead and try my own, omitting the yogurt and other dairy products and just make it the simple way.
Usually I make it the night before, after I finish with the dinner dishes and while I am making the kids' lunches for the next day.
Here's the super simple recipe that I made up.
For 2 people:
1 cup oats -I use either the Quaker Old Fashioned Oats or the Trader Joe's Organic Rolled Oats ( I prefer the Trader Joe's but both work fine)
handful raisins
teaspoon cinnamon
pinch of nutmeg
tablespoon ground flax seed- I use the blueberry flavored.
soy milk- enough to completely cover the oats. (You could use rice or almond milk)
Mix together, put it in a covered container in the fridge, and forget about it until the morning.

In the past I have added honey and dried apples.I might try a little pumpkin in it one of these days. The beauty of it is you can make it anyway you want. My husband likes to heat his in the microwave, I eat mine cold. For Moms - even the kids like this!
Thai Chicken & Coconut Soup
Being dairy free means giving up a lot of foods that have that creamy goodness we all love. I haven't had chowder, fettuccine Alfredo, or cream of, well... anything, soup in at least 3 years. And I would be lying if I said I didn't miss it. I do! I thought I was done with creamy soups until the day my Mother in Law made this soup for us. I must have asked her a hundred times if she was sure there was no dairy in it because it was so good I was convinced there had to be. She showed me the recipe and sure enough, there was only coconut milk. The flavors that really make up this soup are ginger and lemongrass. The coconut milk is what gives it the creaminess, and the lime juice added at the end gives it a little tang.
My Mother in Law was kind enough to share the recipe with me, and I have made it quite a few times for my family. Even my 4 year old loves it. That says a lot, because she can be very picky about certain foods. According to both kids and the husband this dish gets the highest rating- 2 thumbs up and "do-over" status ( which is what my kids say when they want me to make it again). Hope you enjoy it!

Ingredients:
3 pieces dried lemongrass
6 coin sized slices fresh ginger, unpeeled
2 cloves garlic, unpeeled
handful crushed pepper flakes ( or you can also use 2 fresh Serrano or jalapeno peppers)
2 14 oz cans chicken broth
3-4 boneless skinless chicken breasts
1/2 cup coconut milk
3 tablespoons cornstarch
2-3 tablespoons fresh lime juice, plus sliced lime for garnish
1-2 tablespoons soy sauce
3 scallions, sliced
fresh cilantro leaves (for garnish)
Fettuccine noodles ( or noodles of your choice)- based on 4 servings
Directions:
Prepare pasta while the soup is cooking
Smash each lemongrass stalk with chef's knife and place in large soup pot
Slice ginger and crush ginger and garlic with chef's knife. Add to soup pot, along with red pepper flakes.
Pour in chicken broth and bring to a boil.
Add chicken breasts to the broth. Cover and simmer gently over low heat until chicken is cooked through. About 10 minute or more, depending on the thickness of each piece.
Remove chicken from broth, and set aside.
Bring broth to a rolling boil and let boil for about 5 minutes. If some of the broth evaporated, you can add more chicken stock.
Strain broth into a saucepan, press on the solids to get all the flavors and juices into the broth. Stir in the coconut milk and heat through.
In a small bowl or measuring cup stir together the cornstarch, 3 tablespoons water, lime juice, and soy sauce with whisk. Add to the soup, stirring until the broth thickens slightly.
Slice the chicken and add to the soup. Let simmer for a couple minutes to reheat chicken and let all the flavors mingle.
Season with additional lime juice if desired
Serve soup over fettuccine noodles, garnish with cilantro and scallions
(This time I chose to serve it over penne pasta. Just as good!)

Original Recipe courtesy of Deborah McWee ( with some alterations made by me)
Monday, October 18, 2010
South African Sweet and Sour Chicken
We have recently been introduced to South African food, thanks to our friends who just recently moved here from South Africa. It's been a lot of fun learning about different styles of cooking and new ingredients that I've never used before. We've had several dinners together at each other's homes- we've made typical American food for them, and they have made typical South African food for us. She taught me how to make a traditional Sunday meal of roasted leg of lamb, potato crisps, and a green bean and potato mash (soooo good!) I made my BBQ, homemade baked beans, and coleslaw. They taught us about Braai's, we've had them over for a cookout. (basically the same thing). But one of my favorite dishes has to be the Sweet and Sour Chicken. It's just so good!
1 cup Mrs. Balls Chutney
1 Cup ( or a little less) mayonnaise
4 boneless skinless chicken breasts
4-6 potatoes, peeled and cut in half
Preheat oven to 350.
Place chicken and potatoes in baking dish.
Mix mayo and chutney together, pour over chicken and potatoes.
Place in oven for an hour or so, until chicken is cooked through and sauce has thinned.
Spoon onto serving platter. Skim fat off top of the sauce if you would like to use the sauce as a gravy.
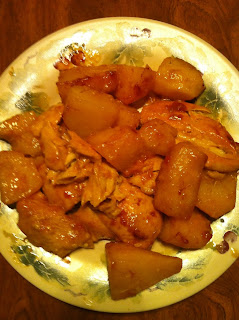
I served it with a green vegetable on the side.
Recipe courtesy of Rochelle Vermeulen
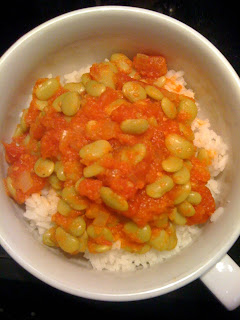
Curried Butter Beans
This year we joined a CSA (Community Sponsored Agriculture) for the first time. The whole family loved it. Every Wednesday was like Christmas- we'd go get our bag of fresh veggies and the girls would be so excited to see what new things we would get that week. We got red potatoes, white potatoes, vidalia onions, black eyed peas, green beans, zucchini, yellow squash, Pattypan squash, eight ball squash, cantaloupe, watermelon, tomatoes, cabbage, radishes, cucumbers, eggplant, strawberries, butter beans, homemade raspberry preserves, apples, green peppers, and more. In a couple weeks our Fall CSA will start and we can't wait. Even the kids are excited to see what we're going to get in our bag each week.
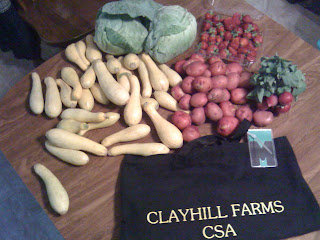
There are several reasons I loved being a part of the Clayhill Farms CSA. For one, we got veggies that we use on a weekly basis. There weren't any "gourmet" veggies that we would never use, or get the kids to try at the ages they are. It was mostly our staple veggies that we would normally buy, so we saved money on our grocery bill. That being said, there were also a few new veggies that we had never tried, such as butter beans and fresh black eyed peas. These new veggies led to trying a couple new recipes that were actually quite good! And the best thing of all- the kids liked them too!
One of these newer veggies was Butter beans. I had never cooked or eaten them, or even seen them before. So I started researching recipes to see what I could do with them. Most of the recipes I found were Southern, therefore calling for cream or cheese (or both). But I did come across a dairy free recipe that I used as inspiration but changed to fit the ingredients I already had on hand- Curried Butter beans. My husband and I love curry and I add curry powder to several of my dishes so we decided to give this dish a try. It was so easy to make and was very tasty. We agreed it makes a fabulous lunch dish- it's light and very tasty, but it's meatless and low fat so not high in calories.
Recipe:
Ingredients
1lb fresh butter beans, boiled until tender ( if not in season, you could use canned butter beans or Lima beans instead)
2 tablespoons olive oil
1 white onion, finely sliced
3 medium tomatoes, pureed in food processor (if you don't have fresh tomatoes use canned tomatoes)
1 can diced tomatoes
1 teaspoon mustard seeds
1 teaspoon crushed or minced garlic
pinch of salt
1 teaspoon cayenne pepper (or more if you like spicy)
1 teaspoon ground cumin
Curry powder to taste
White or brown rice
Directions:
Boil butter beans until soft. Remove from heat and strain ( if using canned omit this step)
Heat oil in a pot, add onions and saute until soft and turning a golden color.
Add mustard seeds, until they begin to pop. Add pureed tomatoes and canned tomatoes.
Add garlic, chili powder, cumin, curry powder,salt and stir.
Let simmer for about 10 minutes, to let all the seasonings mingle. Add Butter beans. Stir and let simmer on low heat for about 30 minutes.
Serve over rice of your choice.

Tuesday, October 5, 2010
Why I am starting to Blog
I have tossed this idea to start a blog around for quite some time. It came about when I started searching for good dairy free recipes online. Most that I have come across are vegan- which of course means no animal products at all. So it's been difficult to find good recipes that are dairy free but contain meat.
Let me give you a little background into my reason for avoiding dairy like the plague. First of all, I used to live off of cheese. Everything I ate had some form of cheese in it. I LOVED CHEESE. Pizza, cheesecake, stuffed shells, ravioli, lasagna, enchiladas, nachos, 7 layer dip... the list goes on and on and on. A few years ago I started developing lactose intolerance. It wasn't bad and a couple lactade did the trick if I wanted to eat cheese. Then I had my 2nd baby and it got worse. Much worse. I was put on GERD medication. I thought I was developing an ulcer. I went to a my doctor a few times and they checked my gallbladder. It took a while but I decided to do the elimination diet on my own. I lived off of rice and plain veggies for a while ( lost several pounds too) but I started feeling better. Ever since anytime I eat anything that has any sort of dairy in it I get very sick. No amount of lactade helps. It was a difficult lifestyle change to make, but it had to be done. I am now totally dairy free. I don't have an "allergy" in the medical sense since I don't break out in a rash or stop breathing if I eat cheese, but it does make me seriously ill. It's really not all bad now that I have found new foods to love. I do miss pizza and crave it all the time, but I have also found a substitute for that. So the past year has been an adventure in eating and cooking, not only for me, but for my family. The hardest part to all of this is eating out and social gatherings. My friends and family have been wonderful trying to accomodate me, but I know it's hard for them. And it's hard for me since there are so many foods with hidden dairy. ( I'll get to that in a later post).
So the purpose of this blog is to share recipes that are totally lactose and dairy free with others who may be in my shoes. And also to share some healthier, but very tasty, recipes with those that are trying to cut dairy out for the purpose of a healthier lifestyle.
I hope you enjoy some of these recipes.
Subscribe to:
Posts (Atom)