Sunday, July 31, 2011

Cooking with the Kids: Bagel Pizzas and Root Beer Floats

As most of you know, I have 3 daughters, 2 of them are old enough to help out in the kitchen. They absolutely love to help me cook and they both have a lot to say about what I should put on my blog. I realize that there are a lot of kids out there with dairy intolerance or allergies, and I like to share recipes and meal ideas that are kid friendly. So I am going to do (hopefully) a weekly, or close to weekly series of posts that will feature cooking with my kids. So here's the first one for you.


Yesterday while we were out grocery shopping my oldest daughter completely shocked me and asked if we could get some bagel pizzas. I was shocked for two reasons: 1.She's my little health nut in the family, and 2.she didn't used to like pizza. Obviously we can't eat the premaid ones in the box, so my husband and I thought it would be fun to make our own for dinner. So we grabbed some Pepperidge Farm mini bagels (they are dairy free) and some fresh pepperoni. (I already had the veggie shred cheese in the fridge).

I make my own pizza sauce- it's super easy, better for you, and you can control what is in it.

Ingredients:
1 can plain tomato sauce
1 can tomato paste
2 teaspoons dried oregano
1 teaspoon garlic powder
1 package Pepperidge Farm plain mini bagels
1 package pepperoni of your choice ( we used Trader Joes)
1 package dairy free cheese of your choice- Veggie Shreds is my favorite, Daiya is a good one too.


Directions:
1.Preheat the oven to 350F. Cover a baking sheet with foil ( makes for easier clean up). Place the bagel halves on the sheet, cut side up. Put them in the oven to toast, for about 10 minutes.


2. While the bagels are toasting, put your sauce together. Mix the sauce, tomato paste, oregano, and garlic powder together in a small sauce pan. Cook on medium heat until it begins to bubble, stirring often to prevent burning.


3.Once the bagels are lightly toasted, remove them from the oven and start adding your toppings. Since the bagels are so small, I used a pastry brush to put the sauce on-it worked really well!


Dairy free cheese alternatives do not melt quite the same as regular cheese does. The pizzas will take about 15 minutes, and are done when the cheese is the consistency you like.


For dessert we had a special treat- Root Beer Floats. Trader Joes has the best Vanilla soy ice cream. Since we had already had a fun dinner, we decided to finish it off with a fun, summertime dessert.


Friday, July 29, 2011

Change Can Be a Good Thing Part 2: Personal Products

Not too long again I did a post entitled: Change Can Be a Good Thing. It was about the changes we have been making around our home to be more green- using green cleaning products, recycling, composting, and starting our garden. We are doing this for the health of our children, and to teach them how to live a more sustainable and healthy lifestyle.
To follow up on that post I want to show you what I have been doing to change my hygiene products as well. Everyday we use so many things on our bodies- toothpaste, creams, soaps... the list is endless. And in recent years there has been a lot of information coming out about the dangers of the chemicals in products such as sunscreen, bug repellent, deodorant, and diapers. It can be really scary as a parent to think of all the dangerous chemicals my children come in contact with on a daily basis.
The problem that I have run into is finding affordable, safe alternatives for us to use. And they still have to work well. For example, we tried Nature Babycare biodegradable, chemical free diapers on our youngest daughter. They were great- as long as they were dry! As soon as they got even a little wet they started to break down- while still on the baby! That is a very bad thing, since I ended up changing not only her diaper, but her clothes several times a day.
It can take a long time, and testing several products to find the ones that are going to work for you. Here is what I have changed to so far.

Baby Items:


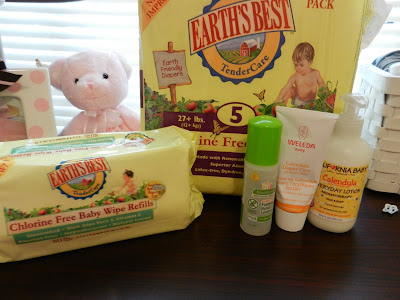
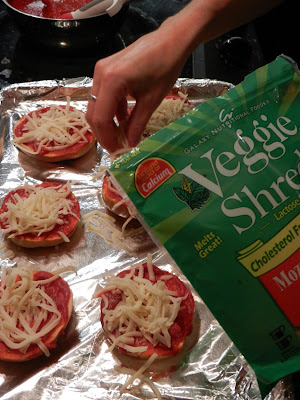
This was the first group of products I did a major overhaul on because I felt it was the most important. When I was still pregnant with my youngest daughter, my husband and I decided we would not use Pampers on her because of their new "drymax" in the diapers. I did not like the idea of chemicals in her diaper, in such a sensitive area. We tried several brands of diapers- Seventh Generation, Earth's Best, Nature Babycare, and Huggies Natural Care. We still go between all but the Nature Babycare. We get the Huggies when we have to go to the store for them, and get the Seventh Gen. or Earth's Best on Diapers.com- I usually get the ones that are on special that week. As for wipes- I have tried all of them- every brand- in the past 7 years. For the past year we have stuck with the Earth's Best. I LOVE them!


As for personal baby care:


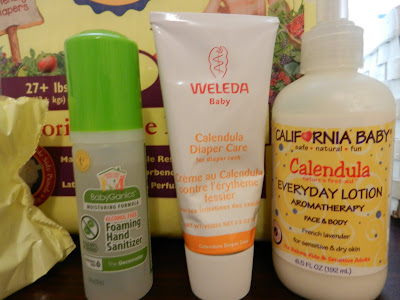
We use Babyganics hand sanitizer- she's 1 and tends to put her hands in her mouth, Calendula cream (it's lavender scented), and Weleda Calendula diaper cream- it's honestly the BEST diaper cream on the market. All of these products I get from diapers.com.

Kids:


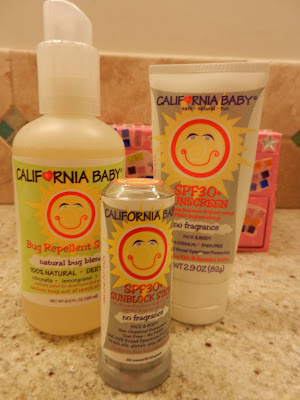
The most important items for me to get organic for the older kids were their bug repellent and their sunscreen. Both of these items can be pricey, but it's an expense I don't mind too much.
We use California Baby products on all the kids. You can find them online, or at Babies R Us, Target, and specialty grocery stores.
Items I still need to change for the girls are their bath soaps, toothpaste, and shampoo.

My Personal Care Items:

The biggest issue with my personal care items was the cost. Beauty products are expensive to begin with, but organic ones are even more so. Luckily, Trade Joes is affordable and, while they may not be organic, they are a lot safer than what I was using.


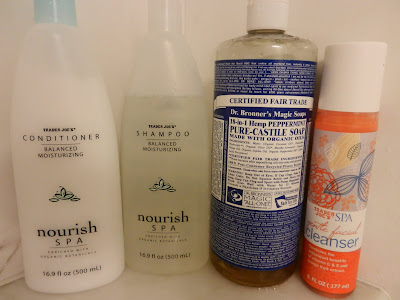
I love TJ's shampoo, Dr. Bronners Peppermint Castille soap, and their face wash. And the best part- they are cheaper than the other brands I was buying! Score!


A few of my other favorite items are my Toms Deodorant, Toms Toothpaste, Tea Tree oil for blemishes, and Aveda products for hair care. For 1st Aid I use Calendula Gel for mild burns, bug bites, cuts and scrapes. The Arnica gel is for bruising and swelling, sore muscles, and cramps. These items are safe and can be used on children as well.

And my most favorite beauty product:

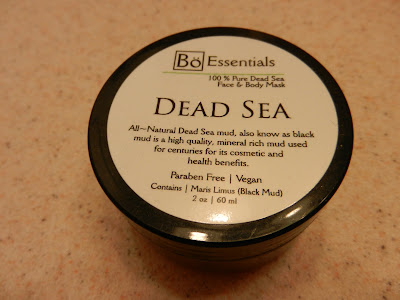
This is similar to what they use in spa facials, but half the cost! My husband jokes that he doesn't understand why women clean their faces with dirt.:-)

I feel I have made some great progress with changing out a lot of the products we use, but I know there are more changes yet to be made. I am still researching makeup, but I don't wear a lot to begin with. That will be my next challenge.

What is one product that is most important to you to swap out for organic?

Thursday, July 28, 2011

Fresh Idea- Oven Roasted Green Beans

All summer long we have been getting fresh green beans from our CSA. While we were at the beach my mother in law roasted some of our fresh green beans. I had never done them this way, usually I boil them or saute them. So I was pleasantly surprised to discover this new (to me at least) method of cooking fresh green beans.
I actually had no plans for tonight's dinner, as my husband was at a business dinner in DC, so it was just myself and my 3 girls. I decided on sauteed tofu with pea shoots and bok choy over rice, and the oven roasted green beans. I did boil a small amount of the beans for the Littlest Girl, I don't think she's quite ready for garlic yet:-)

This is so simple, yet so very good.

All you need is:
1 lb Fresh green beans, rinsed and the ends snapped off
2 cloves of garlic, minced
olive oil- I eyeballed it, but it was about a tablespoon or so
salt and pepper


Directions:

Preheat the oven to 400. Line a baking sheet with foil and spray with olive oil spray to prevent sticking.

Toss green beans with garlic, olive oil, salt and pepper. Make sure they are coated well.


Spread on the baking pan. Cook for about 20 minutes, or until they start to wrinkle slightly.


These were absolutely perfect for tonight's dinner- quick, easy, and kid friendly. And yes, my kids eat tofu- all three of them. The husband, however, is a different story:-)

Thursday, July 21, 2011

Coming Soon- Dairy Free Omnivore's First GIVEAWAY!

Wow THREE posts in one day?!? :-)

Hello all!
Just a heads up for all of my readers- I will be doing my very first GIVEAWAY! I won giveaway in July, and decided to pay it forward and do one of my own. I will be sharing all the details tomorrow here on the blog, and on my Facebook Page. If you have a Facebook account, check out my page and click the "Like" button to get updates and just to network with others who share the DairyFree lifestyle!

I don't think you will want to miss this one! Stay tuned!


~Steph

Beat the Heat with Watermelon Salad

Perhaps the best thing about summer is watermelon. And we certainly take advantage of that all summer long! I have 3 watermelon in my overflow fridge right now that I am sure will get eaten in the next week!

Last summer I came across a recipe for a watermelon salad that is so simple, yet so good. I cannot remember where I got the recipe, and in fact I cannot find my copy of it, so I made this from memory using the same basic ingredients but I am sure it's a little different than the original.

Ingredients:
1/2 watermelon- cubed
2 tablespoons Balsamic vinegar
1/4 cup extra virgin olive oil
4 green onions chopped
a handful of fresh mint, chopped


Directions:
Cut the watermelon into cubes. This is a very messy process so I find that putting a towel under the cutting board helps.


Add the green onion and mint.

In a measuring cup whisk together the olive oil and balsamic vinegar. Pour over the melon.

Mix well. If the melon is already cold you can serve immediately, or you can chill for an hour before serving.


This is such a simple salad, but it is so refreshing and makes a great dish to share at cookouts.

From Scratch Creamed Corn

It is definitely corn season here in the Southeastern USA! We have gotten corn with our farm share a few times now, and we were given some by my husband's parents as well. You can only eat so much corn on the cob before it starts getting boring, but it's so good! So I am trying to come up with different ways to prepare all this fresh, delicious corn so none of it goes to waste. So far we have boiled it and just eaten it off the cob, we brought some to a gathering with friends and grilled it, and I used some in corn bread. Tonight we made pizzas (more on that in another post).When I was a kid in public school they always served corn on pizza day. So to me, the two go together.

Now you're probably thinking "If I can get it in a can, and it's already dairy free, why would I make my own?" The answer is because home made is always better- at least in my opinion! And creamed corn from scratch is so good!

The hardest part to this recipe is cutting all the corn off the cobs. Our next corn delivery I will boil all the corn at once, then cut it and freeze it to make this easier at meal time.

Ingredients:
6-8 ears of fresh corn
1 cup unsweetened soy milk (I find Trader Joes is the best for cooking)
2 tsp salt
1 tsp sugar
2 tsp dairy free margarine
2 tsp flour

(Not pictured is the flour- my husband was using it for the pizza dough)

Directions:
If using fresh corn the first thing you have to do is shuck it, of course! That is my least favorite part. I am always afraid I am going to find a little critter in there- and last night I did. That ear went on the front porch, worm and all, for my husband to deal with. Worms freak me out.


1. Cut the kernels off the cob using a sharp knife. I placed mine on a plate and made a mess- next time I'll use a bowl.

Yup- I made a mess!

2.Take half of the kernels and put them in a food processor. Pulse until just smooth.

3.Put all the corn in a saucepan with 1 cup soy milk. Bring to a boil, and let simmer on medium low heat for about 10 minutes. Stir in the salt and sugar.


4.Make a roux in another small saucepan using the butter and flour. Melt the butter on very low heat, and add the flour. Be careful not to burn it. Add this to the corn mixture. Stir until slightly thickened.

Sprinkle with salt and pepper if desired, and serve hot.

For dinner last night we had pizza, watermelon salad, and the creamed corn. It was a great summer evening meal!

Yes, this is my plate- the pizza was made with veggie shreds mozzarella cheese and turkey pepperoni.


Oh and here's this week's CSA delivery: Tomatoes, green beans, 2 watermelon, 2cantaloupe, and of course, the corn.

Friday, July 15, 2011

Skillet Cornbread with Fresh Sweet Corn and Basil

This week I am awash in fresh fruits and veggies- not that I am complaining! There are few things better than a fridge completely full of fresh, organic, locally grown fruits and veggies. Wednesday is CSA delivery day and this week this was in our bag:


Not only do we belong to the CSA, but my in-laws also have their own huge garden, and access to a wonderful farm stand, so they bring us fresh fruits and veggies when they come to visit. On the same day we got our CSA bag they also brought us 13 ears of fresh, organic sweet corn and the most delicious cantaloupe.


I was in the mood to bake and experiement in the kitchen the other day ( as I am most days), and decided I wanted to make corn bread to go with dinner, which was also going to be a new recipe-black bean and squash enchiladas ( recipe to come as part of our vegan challenge). Lucky me- I happened to have a bag of Bob's Red Mill Cornbread mix in my cabinet. (It's gluten and dairy free too!) I didn't want just plain cornbread so I decided to change it up a bit- by using some of my fresh corn and a handful of the basil I have growing in my garden.

For this I just followed the directions on the bag, and added in my extras. Easy Peasy! Not really a "recipe", but more an idea of how to change things up on your own.

Ingredients:

~1 bag Bob's Red Mill Cornbread mix
~2 eggs
~cooking oil*
~2 cups fresh corn
~soy milk*
~handful fresh chopping Basil
~Vegan Margarine

*Amounts are on the bag


Directions:
Preheat oven to 375F. Place 1-2 tablespoons margarine in oven safe cast iron skillet and place in heated oven to melt the margarine.


In the meantime, mix up the cornbread mix according to the directions on the package.

Once all the orginial ingredients were mixed well I added my corn and chopped basil, and folded them in.

Pour the mixture into the heated skillet, and bake according to the time on the package. I had leftover batter, so I filled two mini loaf pans as well. Those two mini corn breads are currently in my freezer. They will be great for lunch, or to go with my Black Beans and Rice.


It wasn't the pretties corn bread I've ever made, but it sure was delicious! Next time I won't put quite so much batter in the skillet, and I will dot the top with some margarine to help it brown up more.

I plan to try a few more variations as well.

Hope you enjoy!

Wednesday, July 13, 2011

Who Needs Fast Food?~Oven Baked BBQ Chicken Tenders

My kids LOVE chicken nuggets. My middle daughter would eat them for every meal if we let her. I have bought the Purdue premaid ones for them (I buy very few premaid items- this happens to be one of them because they are dairy free.) We also take them to Chick-fil-A for a treat now and then. But I'm tired of feeding them junk, even in the very small amounts that we actually buy. So the other night when they were asking for Chick-fil-A, I decided to make it for them instead. They were fine with this compromise because they happen to love these chicken tenders. I found the recipe in one of my "Eating Well" magazines a while ago and have made it several times. These chicken fingers, paired with Trader Joe's new fries, and fresh veggies made up a very kid friendly dinner. (And Mom and Dad friendly too!)

There are 3 steps: Marinate, bread, bake.

Ingredients:
1 cup barbecue sauce- I used Sweet Baby Rays
2 tablespoons Dijon mustard
2 tablespoons honey


1 1/2 pounds chicken tenders (I used chicken breasts and just sliced them)
1/2 cup all-purpose flour
1/2 teaspoon salt
1/2 teaspoon freshly ground pepper
2 large eggs
1 3/4 cups coarse Panko breadcrumbs,
Olive oil cooking spray


Prep Time: 40 minutes

Total Time: 1 1/2 hours (including 30 minutes for marinating)


Directions:
Preheat oven to 450F. Line rimmed cookie sheets with aluminum foil and spray with non-stick spray.

1.Combine BBQ sauce, mustard and honey in a measuring cup. Cut any large chicken tenders in half lengthwise or if using chicken breasts, cut them into strips. Place chicken in large dish and add the sauce, tossing to coat evenly. Marinate covered in the refrigerator for 30 minutes to 1 hour.


2.Combine flour, salt and pepper in one shallow dish, lightly beaten eggs in another, and put breadcrumbs in a third dish. Coat each tender in flour, shaking off any excess. Dip in egg and let any excess drip off. Then roll in the breadcrumbs, shaking off any excess.

Place the tenders on the prepared baking sheet. Spray both sides of each piece of chicken with cooking spray

4.Bake for 10 minutes. Turn each tender over and continue baking until the outside is crisp and the tenders are cooked through, about 10 minutes more.


We served it with Trader Joes Fries:

So so good!

We also cut up some fresh veggies- cucumbers and carrots- to serve with it. Kids love finger foods, and my kids especially love fresh veggies. They had Ranch dressing with theirs, I had garlic hummus.


We turned the leftovers into sandwiches the next day.


Happy Cooking!

From EatingWell: January/February 2010