Since I can't just run through the drive-thru ( not that I would anymore even if I could- ewwww) I like to have things on hand that are easy and quick to make in case I need to eat on the run. Today was one of those days that I didn't have time to stop and eat. I had both girls' school Christmas parties back to back, so all I had eaten was some pomegranate applesauce and my morning coffee. By the time I got home I was STARVED. On the way home all I could think of was the yummy noodle meal in my cabinet. I had picked it up at the store last week. It was a vegan meal, with basic ingredients and NO DAIRY (or fish products). I followed the directions and got ready to finally sit down and have some lunch (by now it was 3pm). But... it was DISGUSTING. It was so bad that no matter how hungry I was I just couldn't eat it. The noodles were mushy, the sauce didn't have a good flavor at all- I can't even describe it. Way too much garlic mixed with too much soy sauce, and then made sticky somehow. My expectations weren't overly high for a meal out of a box, but this was beyond bad. It ended up in the trash and I ate a pretzel rod instead.
So my rating scale doesn't even count on this one. Because on a scale of 1-5, it was a Zero hands down. (And I'm still hungry...)
Off to scrounge for something tasty.

Monday, December 20, 2010
Saturday, December 18, 2010
Oops I made too much rice... so make Rice Pudding!
Have you ever over estimated how much rice you'll need for a meal and ended up with leftovers? I did this last night and rather than waste 2 cups of cooked rice, I decided to try making my own dairy free rice pudding. My kids love rice, and they love pudding, so I thought "why not?" Plus my in-laws had unexpectedly stayed for lunch since their car died in our driveway so I decided to make it for them too.
I searched online through several sites for a good recipe, but I didn't find what I was looking for. So I decided I would just combine 2 methods and see what happened. The results were actually quite good!
It was super simple and didn't take very long at all.
Ingredients:
2 cups cooked rice
2 cups vanilla soy milk
pinch of salt
1/3 cup demerara sugar
2 eggs, beaten
1-2 teaspoons ground cinnamon
1 teaspoon ground nutmeg
1 teaspoon vanilla extract
handful raisins
My Method: I combine the stove top method with the oven method.
Preheat oven to 350 degrees.
Add 2 cups cooked, leftover rice to a pan.
Add 2 cups Vanilla Soy Milk.
Add 1/3 cup demerara sugar
Add pinch of salt
Cook on medium low heat until the rice softens, stirring often.
Spray casserole dish with olive oil cooking spray
Once rice is softened and sugar is dissolved, remove from heat and pour into casserole dish.
Add beaten eggs, cinnamon, nutmeg, vanilla, and raisins. Stir well so all ingredients mix in completely.
Put in oven for 30 minutes. After 30 minutes, stir.
Cook for 10 minutes more, or less. Do not let it get too dry. If all the liquid dries up, add a splash of soy milk when you remove it from the oven.
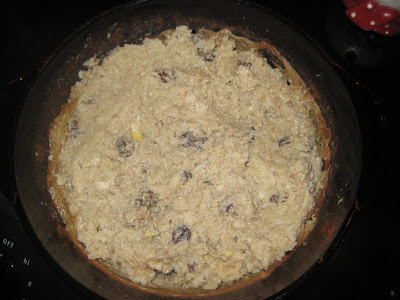
I've never thought rice pudding was an attractive dish, but it sure is tasty on a cold day!
When asked if I should make it again, I got a unanimous "Yes" from my family.
Tuesday, December 7, 2010
When in the South...
Today I did something I never ever thought I would do. I roasted my own peanuts. Our winter CSA gave us a bag of green unshelled peanuts and when I asked the farm owner how to cook them, she said just put them in the oven and roast them. I always thought roasting peanuts would be more difficult, after all you pay so much for roasted peanuts by Planters. But nope, this was so simple and something I will definitely do again!
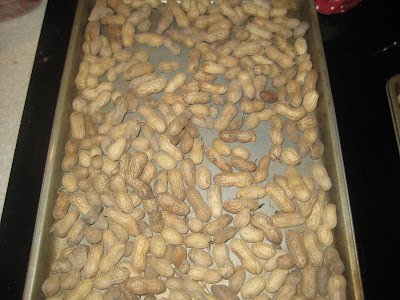
Before roasting
Preheat the oven to 350 degrees.
Put the peanuts on a cookie sheet, making sure to pick out leaves, stems, and shrivelled peanuts.
Put them in the oven for 20-25 minutes
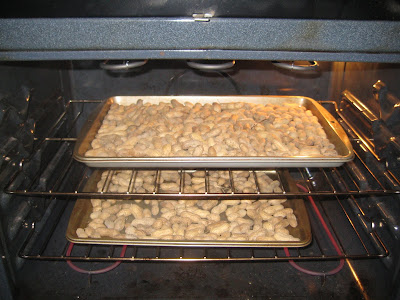
Take them out before they are completely done, as they will continue to cook in the shell.
After they have cooled, put them in an airtight container.
That's it. Nothing fancy, not a lot of steps. And my husband loved them! Hope we get more this week!
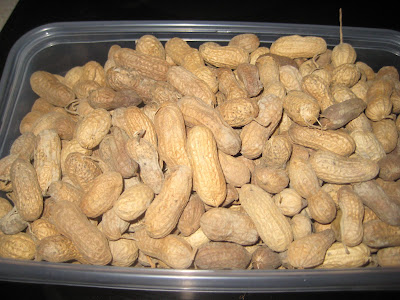
All done, cooled, and ready to eat!
Product Review #1: Amy's Kitchen Gluten Free Non- Dairy Spinach Pizza
I am going to be adding product reviews to my blog along with the recipes. My cheese-eating husband will also be helping with it by giving his opinion on dairy free products I try. This will ensure a non-biased review of a product. So often I have been so excited to find something that is a dairy replacement, only to be disappointed when it turns out to be awful. And since most of these products are more expensive, it can be a waste of money to buy something that turns out to not be edible or enjoyable.
My rating scale will be 1-5. 1 Being "a waste of money, totally unlike the real thing, not at all enjoyable" and 5 being "Can't tell it's dairy free".
I'll rate it based on:
Appearance
Texture
Taste
Over all score will be an average of these 3.
The first review is of Amy's Gluten Free, Non-Dairy Spinach Pizza. I LOVE pizza and I miss pizza so I have been trying to find a substitute to satisfy that craving I get every now and then. My local grocery store recently stocked this product (they carry a lot of Amy's Kitchen, but I haven't seen this pizza there before).
On Appearance I give it a 3. The cheese doesn't melt very well, and the crust burns easily on the edges.
On Texture I give it a 2. The crust is too soft and crumbly. It's almost mushy in spots. The crust seems to absorb too much moisture from the spinach mix.
For Taste I give it a 4. It actually has a very good flavor- the spinach mixture tastes almost like a pesto and I can taste a flavor similar to parmesean cheese. The soy mozerrella cheese has very little flavor but the spinach makes up for that.
Over all I give it 3.5. I give it the extra half point because, surprisingly, my very picky 4 year old loves it. She had 2 helpings. It's good for kids because it's not too cheesy so it's not a choking hazard, and the sauces aren't overpowering so it's easy for them to eat.
It's not like the real deal, but it's not bad either.
Magical Birthday
My oldest daughter is turning 7 years old, so we had her birthday party this past weekend. This year she had her heart set on a Harry Potter themed party and how could I say no? The only problem was that the party stores don't really sell HP themed party supplies so I had to be very creative.
The first thing we did was make the invitations which were their acceptance letters to Hogwarts.

( I covered up the child's name for the picture)
They also got their ticket for the Hogwart's Express:

(I covered our address for the picture)
The envelopes were even sealed with the red wax seal with the Hogwarts crest on it.
We kept the decorations simple outside with just a Hogwarts Sign:

Train Tracks on our front sidewalk:

And Harry's Nimbus 2000 by the front door:

I had a couple friends dress up. One was dressed as Mrs. Weasley, one as Professor Snape, and I was Professor McGonagall.
We based the party mostly on the first book- "The Sorcerer's Stone". I set up 4 classes for the kids to take:
The first class was Defense Against the Dark Arts. For this the kids played freeze dance and whenever my husband ( who was playing Prof. Quirrell for this game) said "Stupify!" the kids had to stop.
The second class was Potions with Professor Snape. My best friend's husband played the part of Snape for us and did a fabulous job! I had a table set up with a large plastic cauldron. In it I placed a pitcher of white vinegar, plastic cups, baking soda, and 4 vials of food coloring. The kids got to make "Good Luck Potion" by adding vinegar to their baking soda and food coloring mix.
Care of Magical Creatures was third. Since it is so close to Christmas we decided to incorporate a Christmas project by making reindeer food. I had bags labeled with a poem found online:

Then the kids filled their bags with dry rolled oats and sugar cookie sprinkles. Some recipes say to use glitter, but the birds eat the glitter and it makes them sick. The sugar sprinkles are much safer. The kids had a great time with this project.
The last class was Herbology. I found small plant kits at Lowe's for the kids to plant. We had Edelweiss, Spruce, and Allysum.

After all the classes were completed we had the Feast in The Great Hall. ( here's where we get to the food)
We set up our main living room to look like the Great Hall and decorated with Gryffindor Colors (since my daughter was dressed as Hermione) My husband set up 2 small disco balls to make the ceiling look enchanted. I even found crackers in Gryffindor colors!

Since it was mostly 5-10 year olds I didn't have a lot of food- just snacks. We had:
Dragon Wings: Straight out of a bag breaded chicken wings. These were specifically requested by the Birthday Girl. ( they were Dairy Free too!)
Dragon's Blood Punch:
Equal parts apple juice, cranberry juice, and ginger ale. I started by adding each in 2 cups at a time until my punch bowl was full. It was really yummy!
Muggle Mix:
Your basic Chex mix recipe that can be found on the box of Chex cereal- nothing fancy for this. ( Kids don't do fancy, they do simple)
Magic Wands:
Long Pretzel Rods
1 bag semi-sweet chocolate chips
different color sugar sprinkles
Line a baking sheet with wax paper
Melt the chocolate chips in the microwave- took about 2 minutes. I do it in 30 second intervals and stir often to keep them from burning.
Spread the melted chocolate on the top 1/3 of the pretzels. I used a small spatula and it worked great.
Lay on the lined baking sheet and sprinkle with sugar crystals.
Place in refridgerator overnight to harden the chocolate.
These were a hit! I even made extras just for the adults at the party.

I baked her castle shaped cake, but I had a friend decorate it since I don't start my cake decorating class until tomorrow:-). She did an amazing job!
It was just a basic chocolate cake with chocolate frosting, buttercream frosting, chocolate chips, butterscotch chips, and a little coconut. Of course we added re-lighting candles to it for a little "magic" of our own!

The last thing was the goody bags.

I made all the kids magic wands of their own by cutting long wooden rods into 8 inch segments and spray painting them brown. Then I added some lines of gold paint to the tips.
I made 2 small treat bags to put in the larger bags. One was from
Weasley's Wizarding Wheezes and in it I put a finger trap and a kaleidescope.

The other was a sweets bag from Honeydukes with candy and a chocolate brownie shaped like a frog (was hoping to make chocolate frogs in candy form but was unable to find a frog shaped candy mold, so I had to settle with cutting brownies into frog shapes)


The party was a success and I did have a lot of help to pull it off. Now my younger daughter is already planning her party for the spring!
Subscribe to:
Posts (Atom)