Showing posts with label Casserole. Show all posts

Tuesday, May 8, 2012

Easy Weeknight Casserole- Just Like Mom Used to Make

Casseroles are definitely a Mom's best friend- they are easy to make, most can be made ahead of time, and kids seem to love them. The challenge is finding dairy free casserole recipes.  I used to make several- but they all contained some form of cheese, creamed soup or sauce, or milk.  Then one night my Mom had us over for dinner and made this dish that she used to make at least once a week when I was a kid.  Of course back then she used cheese, but for me she has omitted the cheese.  It has since become my 3 daughters' favorite meal, both at Mom's house and at mine.  We call it American Chop Suey and I have absolutely no idea why (Maybe you can answer that one for me, Mom?)
My oldest daughter has been asking me to share this recipe on the blog for about a year now, but I haven't had the chance.   Usually I make it on nights when we are running around and I don't have time to take pictures while I cook.  The other night I started it early enough and remembered to take pictures as I went along.  So here you go, my girls' absolute favorite meal:

American Chop Suey
Ingredients:
1lb lean ground beef
1 pepper (of any color) chopped
1 medium white onion chopped
1 can diced tomatoes
1-2 cans tomato sauce
dried oregano (you can use fresh if you have some)
1-2 teaspoons dried basil
1-2 teaspoons dried thyme
salt and pepper to taste
noodles of choice- Penne or Rotini work best


Directions:
1. Chop all your veggies and mince your garlic and set aside

2. Preheat a large skillet, drizzle in about a tablespoon of olive oil, and add your ground beef.

3. Once your meat is mostly browned, add your onion, peppers, and garlic.  If you use a high fat content beef, drain the fat off first.  We use extra lean, organic beef so I don't have to drain mine.


4. Once the beef is cooked through and the veggies have softened a bit, add your canned tomatoes, tomato sauce, and your spices.   Let simmer for as long as you want on low ( I will let this go for an hour or more on very low heat). Or if you want it sooner, simmer on medium heat until the sauce thickens slightly.  


5. While your sauce is simmering, cook up your noodles according to the package.  Preheat your oven to 350F.


6. Drain your pasta and combine with the sauce in a large casserole dish. Bake uncovered for about 20 minutes.

If you want to make it ahead of time you can put the casserole in the fridge and cook it later. 


This is such an easy and kid friendly dinner. This time around we paired it with a green salad and my homemade Strawberry Merlot Vinaigrette .  And it makes so much we always have leftovers for lunch the next day.


Do you have a favorite meal from your childhood that you still make as an adult?


Tuesday, December 20, 2011

French Toast Casserole

Christmas morning is always spent at our house, since we have the kids and Santa has been here the night before leaving piles of gifts for them. My parents come over very early, we open our stockings, let the girls open their Santa presents, and then take a short break for breakfast. We dive into the rest of the gifts once the girls have eaten. Once all the gifts are opened and the coffee pot is drained, my husband makes mimosas and we go back for breakfast #2 or start on the leftover from Christmas Eve. Since it is a special day, I am always looking for something fun to make for breakfast instead of the same old cold cereal. Before my dairy issue started, I would make quiche-like breakfast pies with ham and Swiss cheese or egg and cheddar cheese. They are called Impossibly Easy pies and the recipes are from Bisquick. They were so good, but I stopped making them once I could no longer eat cheese. I have yet to try them with my "fake" cheese.
I have found that with 3 kids and all the excitement on Christmas morning, cooking is not really an option. I need something easy, something that can be put together the night before and popped in the oven that morning. I happened to come across the perfect recipe in my Family Fun magazine and I wanted to share it with you all. It really is so easy and perfect for Christmas morning.

French Toast Casserole:
Serves: 8
Total baking time:50-60 minutes

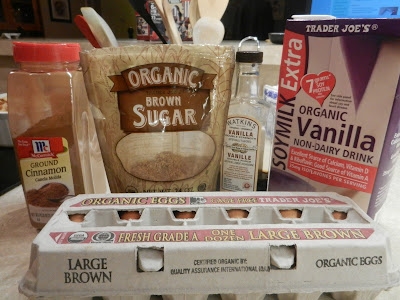
This was adapted from Family Fun Magazine. I did change it a bit though. I omitted the nuts, used light brown sugar, extra cinnamon, added a sprinkle of nutmeg to the top, and used vanilla soy milk. The method calls for 2 layers of bread but instead I made this in a large lasagna pan and did a single layer of bread so it was not at all soggy.

Ingredients:
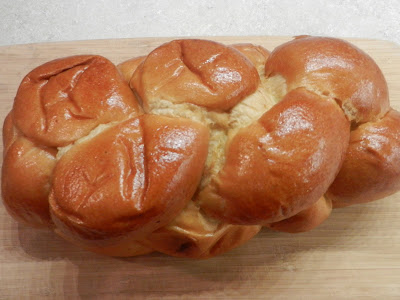
challah bread (can be found in the bakery section)
1/2 cup packed light brown sugar
1 teaspoon cinnamon or to taste (I used a little more)
A pinch of nutmeg
8 large eggs
1 3/4 cups vanilla soy milk
2 teaspoons vanilla extract


Directions:
1. Grease a large pan (such as a lasagna pan) with cooking spray of your choice.
Cut the Challah bread into 1 inch cubes. You don't have to measure, they just need to be around that size.

2.In a small bowl combine the brown sugar and cinnamon.


3.Arrange the bread in the baking dish. Try to have a single layer- it will cook better and will not be soggy. Sprinkle 1/2 of the sugar mix over the bread.


4.In a large bowl whisk together the eggs. Add the soy milk (or non-dairy milk of your choice), and vanilla extract, whisking until they are well blended.


5.Starting from the sides of the dish and working toward the center, pour the egg mixture evenly over the bread. Sprinkle the remaining sugar mixture on top. If desired sprinkle a little nutmeg over the top.


6. Cover with aluminum foil, and refrigerate for at least 4 hours, or overnight. To save time I wrote the baking directions on the foil.


7. In the morning, preheat the oven to 350F. Bake for 20 minutes covered, 30 more minutes uncovered, or until the top is slightly golden.I was still half asleep when I put this in the oven since my coffee was not yet done brewing.


To me, this tasted just like french toast. I will definitely be making this for Christmas morning, along with a few other things.

*Adapted from Family Fun Magazine.

Thursday, November 10, 2011

My Dairy Free Thanksgiving Table

Thanksgiving is only a couple short weeks away, and most us of are already planning either our menu or where we are going to spend the day. For those of us with food intolerances or allergies, this can turn into a rather difficult challenge. Most holiday food, especially for gatherings, has a lot of dairy in it that is both hidden and obvious. If you are playing hostess for the day, trying to decide what to serve non dairy-free people can be tough, especially if they are used to eating all things with cream, milk, butter, and cheese.

This year we are going to be spending the day with my parents. It's no secret that Thanksgiving is my Mom's holiday in our family. She hosts Thanksgiving and Christmas Eve, I get Christmas Day. It works out very well. Ever since I was a kid she always made the dinner, and it was/is always absolutely delicious. My favorite smell (other than the smell of my babies) is walking into her house on Thanksgiving Day. It takes me back to my childhood every time.

~Thanksgiving a few years ago~


There have been a few years in my adulthood that we haven't spent Thanksgiving with my parents, but not many. Usually the years they go to visit my brother and his family we spend the day with my in-laws, and I host at our house. But even the few years we have been on our own, I have stuck with her traditional menu. Last year we hosted friends of ours from South Africa who had never celebrated Thanksgiving. They brought a few of their traditional foods to share, such as Bobotie and a Trifle. We watched the Macy's parade, made Shirley Temples for the girls, drank mimosas, and ate until we couldn't eat anymore. This year they have taken our holiday back to South Africa with them and are sharing the day with friends of theirs who also used to live in the States.

~Last year's Thanksgiving~


Mom and I have come up with our traditional Thanksgiving menu this week so we can get our shopping done early. My oldest has also picked out the centerpiece she wants to make.

What we have to look forward to:
*denotes what I am bringing

Appetizers
~Veggies and a dairy free sour cream dip*. (this dip is a tradition in our family- Mom has been making it for years, and luckily I have figured out a way to make it dairy free. I will share the super simple recipe in a later post)
~Roasted Red Pepper Pesto Dip*
~Mini Crab Cakes*
~Mimosas

Dinner:
~Fresh- not frozen- Turkey: simply oven roasted, not stuffed (takes longer and dries out the breast meat)
~Mom's homemade Stuffing. So simple, yet SO GOOD.
~Mashed Potatoes
~Peas
~Mashed Butternut Squash with Cinnamon and Nutmeg*
~Roasted Acorn Squash (Recipe will be posted after Thanksgiving)
~Green Bean Casserole*
~Candied Yams
~Sweet Potato Cornbread*
~Mom's Homemade Cranberry Orange Relish (recipe will be posted)
~Dinner Rolls
~Stuffed Celery Plate*
~Pickle and Olive Platter

Dessert:
~Apple Pie
~Sweet Potato Pie*
~Pumpkin Pie*
~Pumpkin cupcakes

Of course we will also have wine with dinner, coffee or tea with dessert.

That's a lot of food and we are definitely going to have leftovers! Luckily it will be cooked between 2 kitchens. Seems like a lot of work, but between Mom, Dad, David, and myself we get it all done very efficiently. This year my oldest is also very excited to get to help make dinner. Last year she got to help make dessert.


So there you have it- our Dairy Free Thanksgiving. Just because you are Dairy Free does not mean you have to miss out on a good meal. And it does not mean you need to spend hours slaving over a meal of fancy or strange dishes that dairy loving people may not like. You can have a simple, elegant, comforting, delicious meal and no one will ever even know you cook without dairy. Sometimes simple is better.

What is on your Dairy Free Thanksgiving table this year?

Happy Cooking this Thanksgiving!!


Monday, October 3, 2011

Pumpkin Patches and Pot Pie- The Perfect Fall Day

Halloween is definitely one of our favorite holidays in our family (the only one better is Christmas of course!) Yesterday we celebrated the beginning of Fall and upcoming Halloween by going to the Pumpkin Patch to get our pumpkins, mums, and hay bale for outside.


The girls love decorating for Halloween as much as they love decorating for Christmas, and every year we add to what we have. I have a feeling that one of these days we will be that crazy house in the neighborhood that people drive by on purpose. Once we got home from our adventures at Pumpkinville, we set to work getting the house decorated. The kids and my husband got to work on the yard while I got to work on dinner. Here's a sneak peak at what they have come up with so far:


Meet "Mr. Bones". Yes we named him.


Huge hairy spider- we are going to light him up somehow.


This was my contribution last year- some days it's so fitting!
There are more decorations out than this, and still more to come I am sure. We also have purple lights up, tombstones in the garden, strobe lights, and the girls want a fog machine. Daddy's all for this of course! We don't (and won't) do anything gory or gross, but my kids like the creepy decorations, that's for sure!


Since it was a chilly, drizzly day it was perfect for a comfort food meal. I had come across a recipe for a vegetable pot pie that I wanted to try. I made some huge changes to the recipe- not just to make it dairy free, but I also changed some of the veggies called for because they aren't very popular with my kids. This is adapted from one found on FamilyFun.com.

There are quite a few steps to this, but it really is not as hard as it seems. You have to cook the vegetables, make the filling, add the veggies to the filling, make the topping, and bake. But since there are a few separate steps, the ingredients list needs to be separated as well.

Ingredients:

Vegetables:

1 package frozen vegetable medley with peas, corn, carrots, and green beans
6-7 small red potatoes, peeled and chunk ed
Broccoli- about a cup
1 large carrot sliced (we like carrots)
1 small- medium Onion- quartered and sliced
1 cup Mushrooms- sliced


Filling:
1 cup Soy creamer-plain ( or non dairy milk)
3 and 1/2 Tablespoons Earth Balance Dairy Free margarine
1 teaspoon Thyme
1 teaspoon Garlic powder
Salt and Pepper
1 and 1/4 cup Vegetable broth ( you can use chicken if you want)
3 tablespoons flour
1/4 teaspoon pepper


FOR THE TOPPING:
3/4 cup yellow cornmeal
1 tablespoon plus 1 teaspoon sugar
1 1/2 teaspoons baking powder
1/2 cup soy milk
1 large egg, lightly beaten
1 tablespoon canola oil
1/2 teaspoon salt


Directions:
1.Start by preheating the oven to 400ºF (so you don't forget!). Put the potatoes, carrots, broccoli, and frozen veggies in a pan with enough water to cover.Salt the water (if desired), bring it to a boil, and then allow the vegetables to continue boiling for about 4 minutes. Drain the vegetables and set them aside.


2.While the veggies are cooking, melt the butter slowly over medium heat in a large pot or Dutch oven. Add the sliced onion and mushrooms. Sauté them, stirring often, until they're soft. Stir in the flour and cook the mixture, stirring continuously, for about another 30 seconds.


Add the vegetable broth, creamer, salt, pepper, thyme, and garlic powder. Continue to stir until the sauce thickens.


3.Add the vegetables to the sauce and combine. Add more seasoning, if desired. I found it needed a little more salt and pepper. Let the sauce and veggies come to a gentle boil for a couple minutes while you put the cornbread topping together. Be careful not to burn it though.


4. Make the corn bread topping. In a medium bowl, whisk together the cornmeal, sugar, baking powder, and salt. Add the soymilk, egg, and oil and stir until evenly blended. Transfer the filling to a casserole dish. (I sprayed my casserole dish lightly with cooking spray first, to prevent sticking)


Spread the batter over the filling. Make sure it covers it completely- mine didn't and I had a couple holes-oops!


Bake until the top is golden brown and the sides are bubbly- about 25-30 minutes.

Next time I will take more care to make sure the topping is spread evenly so it looks pretty.

Serves about 8. (or a family of 5 2 with leftovers)

While it was baking away in the oven, I got to work decorating the inside of the house for Halloween.
This is still a work in progress since I need something to go behind the wine bottles, but I love it already.


Once it was done, we sat down as a family and watched "Harry Potter and the Sorcerer's Stone" while we ate our dinner and had hot apple cider. It was the perfect end to a perfect Fall day.


(This recipe was heavily adapted from the original found here. I omitted the cheese, dairy milk and made a few other changes)